
Laboratory 9. Gene trees in Species trees
In the last lab, we looked at two loci (one nuclear and one plastid) from a set of Pyrola samples collected from the Pacific Northwest U.S.. Today we will begin to examine the intricacies of gene trees in species trees using those same data, but from the perspective of gene coalescence. For today’s lab, you will need to install the Mesquite package. You will also need two tree files, the nuclear (nucBS1000.tre) and chloroplast (plaBS1000.tre) trees that I generated last week.
The goals of today’s lab are to:
- Familiarize yourself with the Mesquite interface.
- Use your conflicting nuclear and chloroplast trees (and a known Species tree) to examine Gene coalescence.
- Discuss evolutionary processes responsible for incongruent gene phylogenies.
Open Mesquite by clicking on the executable icon. This program may take a minute or two to start, so be patient.
1. In the File menu, choose New to begin our project.
- Name your new project Lab9.
- When prompted as to whether you want to include taxa in your new file, make sure the Make Taxa Block is checked, and change the Number of Taxa to 9.
2. Under the project tab click on the List & Manage Taxa icon to view the taxon block. You should see taxon 1 through 9 listed—click on the cursor icon (I instead of arrow) and let’s change those names to
picta
aphylla
dentata
cryptofolia
chloranthaasarifolia
Osecunda
Cmenziesii
Ecampanulata
3. Under Taxa & Trees go to Import File with Trees and then Include Contents… to import the nuclear ITS tree is stored. Navigate to the directory where that tree is stored and import the tree. Your file (taxa block and tree) will appear as a menu called Taxa. Rename this file Nuclear.
4. Repeat the step 3 to import the plastid tree, plaBS1000.tre. Mesquite will notice that the taxa for your nuclear and chloroplast phylogenies are identical—when the pop-up warning appears, hit Keep and then OK. Rename the file Chloroplast.
5. During the import process, one or two extra taxon blocks may have been generated. If so, you may delete these.
6. Click on the View Trees icons for your nuclear and chloroplast datasets to view the trees. Are they topologically similar to what you generated for your homework?
7. Next, Click on the List & Manage Taxa icon to view your Species block or navigate to the tab for this block if it is already open.
8. Under Taxa & Trees at the top of the screen, choose New Association… near the end of the menu. In the Select Taxa window, choose Species and hit OK. When prompted for the associated taxon block, choose Nuclear and name the association Nuclear.
9. Make sure that you have the arrow tool selected and choose the first cell in the Nuclear column (for picta). In the window that pops up on the right-hand side of your screen, select all of the taxa corresponding to picta (i.e., have the _pi suffix) and use the left-facing arrow button to move them into the cell for picta. You will need to select all of the taxa to move at one time, so use the Shift and Comman keys to select several names at once.
10. For each cell in the Nuclear column corresponding to a different species, associate the taxa in the Nuclear block with your Species block. Then hit SAVE.
11. Go back to step 8 and create a New Association… this time with the Chloroplast taxon block. Follow steps 9 and 10 for the chloroplast dataset. Then hit Save.
12. Next we need to specify a Species tree—we have two gene trees already. Still within your Species tab, go to Taxa & Trees, then to New Tree Window and choose With Tree to Edit by Hand. Choose the Species block and hit OK. You can rearrange the taxa on your tree by selecting branches and dragging them to the appropriate positions. Move the branches until you obtain this configuration:
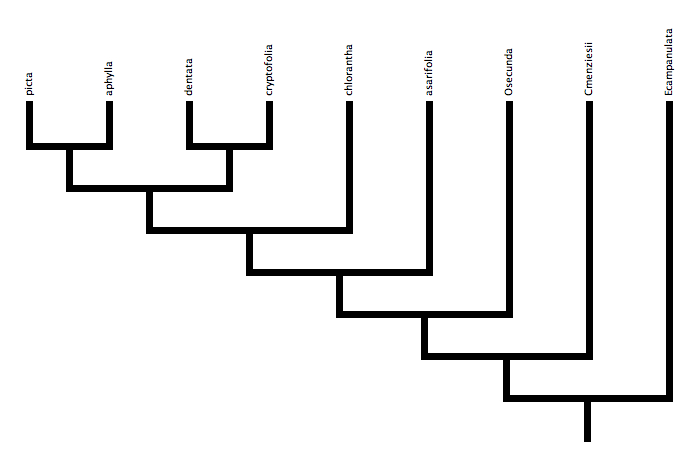
To save this tree, go to Tree at the top of your screen and choose Store Tree As… and then name your tree and tree block both Species. In the menu on the left side of your screen, you should see the species tree associated with your Species block of 9 taxa.
13. Under Drawing go to Tree Form and select Contained Gene (or Other) Trees. Keep the default settings, but make sure that the box for Treat Contained as Unrooted is checked. Then hit OK. For the Source of contained trees, choose Stored Trees and hit OK. Select Nuclear first to visualize this gene tree within your species tree.
14. Before you repeat step 13 for your Chloroplast dataset, consider saving your Gene-in-Species tree as a .pdf by going to the File menu and choosing Save Tree as PDF… then repeat step 13 for your chloroplast dataset.
Do you see a difference in the coalescent histories for your nuclear and chloroplast phylogenies?
For the remainder of this lab, please consider and discuss with your classmates what the gene tree divergences in your species tree mean. Given what you observed in your homework assignment from last week (and the geographic information provided on the next page), consider the possible influences o hybridization, ancestral polymorphism, conspecific gene flow, lineage sorting, and extinction.
What kinds of information about the natural history of this group of species might you wan to know in order to interpret better the conflict among gene phylogenies?
